
Browse all docs
Configure your sites
Sites
The Sites tab is where you set up the chat widget for each website you run and control how it looks and behaves per site, from its color and greeting to its AI, presence, payment, and alert settings.
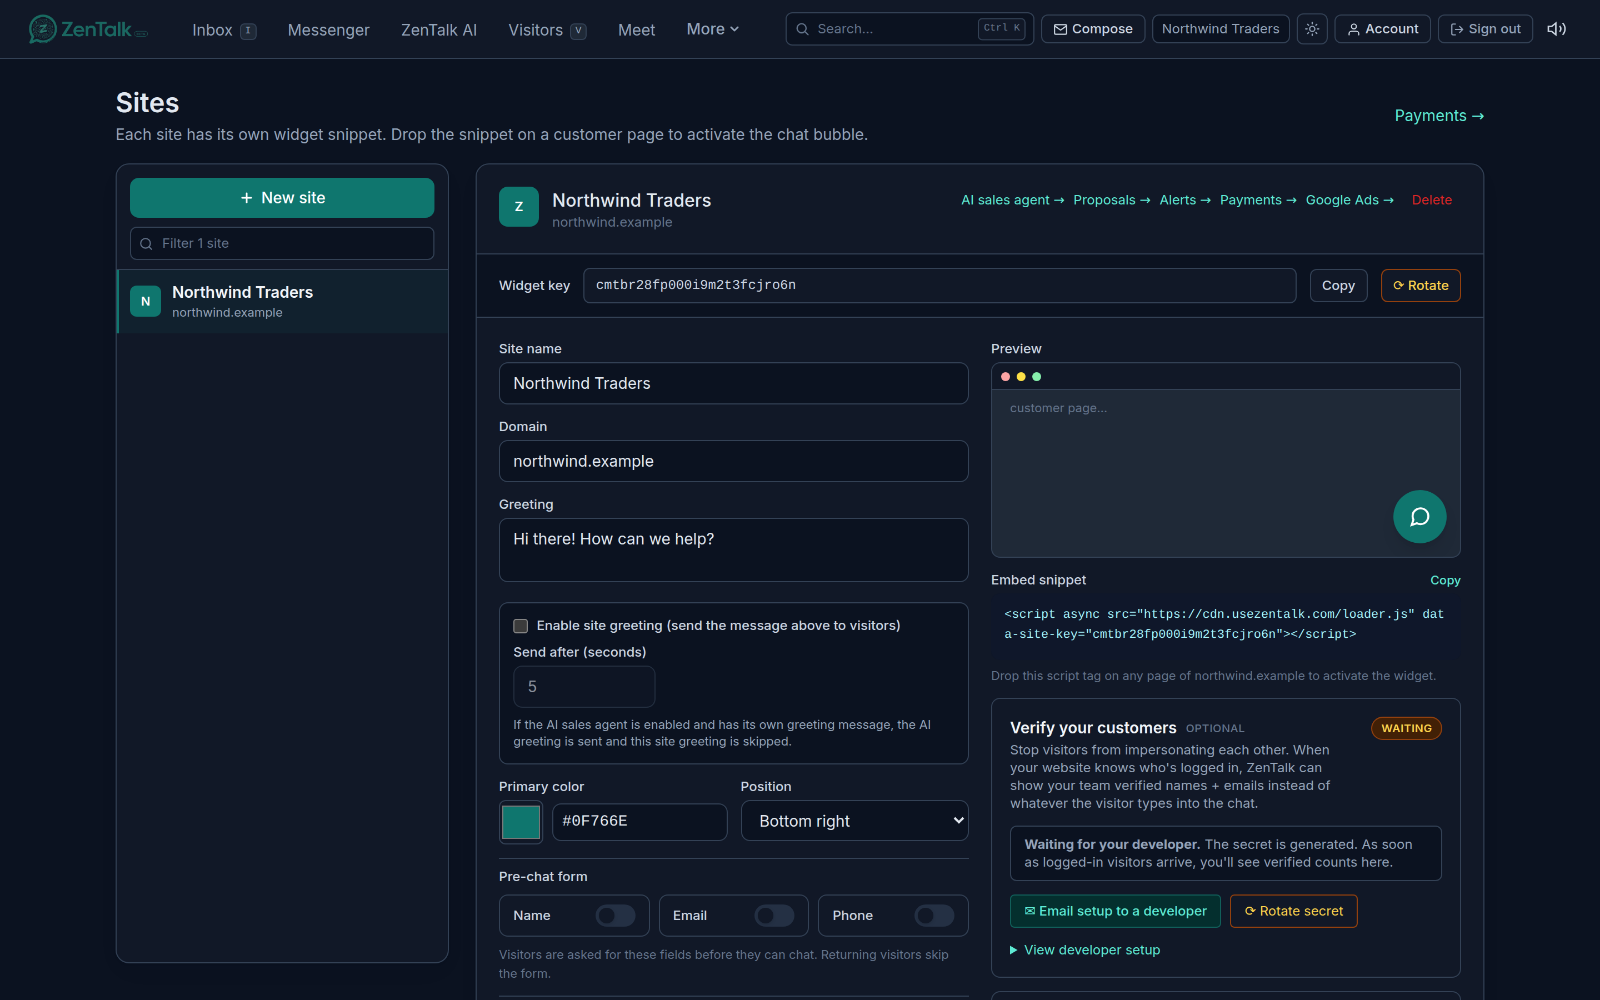
What the Sites tab is for
A site is one website that carries the ZenTalk chat bubble. Each site has its own widget snippet, its own settings, and its own AI configuration, so you can run one workspace across many properties and tune each one separately. Open it from the top navigation. The page shows a two-pane layout: a filterable list of your sites on the left, and the selected site's full settings on the right.
- Left rail: every site in the workspace, with a search box to filter by name or domain, plus a New site button.
- Right pane: the settings card for the site you clicked, or the new-site form while you are creating one.
Most settings can be viewed by anyone, but only workspace owners, admins, and marketeers can edit and create sites. Assigning agents to a site is restricted further to the primary owner.
Create a site
- Click New site in the left rail.
- Enter a Site name (required) and an optional Domain, such as acme.com.
- Click Create. The new site is selected automatically so you land straight in its settings.
ZenTalk also drafts an AI sales agent for every new site from its website, with the bot left off so you can review the draft before it talks to visitors. Open AI sales agent on the site card to review it and turn it on. See AI Sales Agent.
To remove a site, open it and click Delete in the row of actions on the site card. Deleting is permanent and cascades: it wipes every visitor record, conversation, and message tied to the site. Tickets stay but detach from the site. Because it is destructive, you have to type the site name back to confirm.
Get the install snippet
Each site has a Widget key shown at the top of its card. Below the settings you get a ready-made Embed snippet, a single script tag with your key already filled in. Copy it with the Copy link and drop it on any page of your site to activate the chat bubble. A live preview next to it shows the bubble in your chosen color and corner.
If your key is ever exposed, use Rotate next to the widget key to generate a new one. The old key stops working immediately, so you will need to redeploy the snippet on every page that uses it. You are asked to confirm before rotating.
Widget appearance and pre-chat form
The left column of the settings card controls how the widget looks and what it asks for.
- Site name and Domain: editable inline.
- Greeting: the message text. Turn on Enable site greeting to actually send it to visitors as a chat message, and set how many seconds to wait first. If the AI sales agent is enabled and has its own greeting, that one is sent and the site greeting is skipped.
- Primary color: the bubble and header color, picked or typed as a hex value.
- Position: bottom right or bottom left.
- Pre-chat form: require Name, Email, and Phone before a visitor can chat. Returning visitors skip the form.
- Auto-open the chat for visitors: when on, the chat opens on its own a few seconds after a visitor lands. When off, it does not pop open by itself. This switch only controls that timed popup.
- Open the chat when an agent replies: when on, an agent message pops the chat open for the visitor, like a messaging app. When off, the reply only beeps and shows an unread badge on the bubble.
The two auto-open switches are independent of each other and both are on by default.
Channel features and workflow
Toggle which chat capabilities the widget offers. When one is off, its control disappears in both the widget and the dashboard, and the server rejects related requests.
- Visitor-submitted tickets: lets visitors open a ticket from the widget. Turn off for chat-only sites where agents convert tickets from the dashboard.
- Attachments, Voice notes, Voice calls, In-chat translation: per-site feature flags, all on by default. Voice notes also need Attachments on, since audio uploads as an attachment.
- Support workflow: allow agents to close conversations after resolution, and optionally ask the visitor for a 5-star rating after each close. Ratings require close to be on. Leave both off for ongoing sales or concierge chats.
- Keyword Revenue P&L: include this site in the Keyword P&L tab on Insights. Needs an active Google Ads connection and is off by default.
Block IP rules and presence
Block IP rules guards the widget before it does any work. Both rules are off by default, so turn on the ones you want. Block proxies, VPNs, Tor & high-risk IPs checks each visitor against an external threat feed (cached, and it fails open so a feed outage never blocks real visitors). Auto-block rapid bouncers blocks an IP that opens repeated sessions in a short window. When the rapid-bounce rule is on you set the lookback window in seconds and how many sessions trip a block.
Visitor presence and arrival sound tunes the Live list and the arrival chime. Set an Arrival sound delay so a visitor must stay a moment before the chime rings and they show up in Live, which stops phantom doorbells from bots and bounces (opening chat or messaging still rings instantly). Set Keep visible after leaving so a departed visitor lingers in Live long enough for you to act on them. Turn onHide instant-bounce direct visits to trim direct or organic no-chat bounces from History; paid-ad visitors and anyone who chatted are always kept.
AI, payments, store, and alerts
The heavier per-site configuration lives on linked pages reachable from the row of actions on the site card: AI sales agent, Alerts, Payments, Store, and Google Ads.
- AI sales agent: the AI sales agent link opens this site's bot settings, where you configure its persona, knowledge, active hours, and qualification mode.
- Payments: per-site accept-payments toggle and the default merchant from your workspace pool. The workspace merchant pool itself is managed from the Payments link near the top of the Sites page.
- Store: connect a Shopify or WooCommerce store with a single pairing code, which also installs the widget. Once connected, the AI can answer product, stock, and order questions and share checkout links. See Store and COD confirmation calls.
- Alerts: per-site recipients for unhappy-customer alerts (negative sentiment, refunds, chargebacks). Owners, admins, and marketeers.
- Google Ads: connect the site's Ads account for spend sync and auto-blocked IP lists. Admin only.
Site team and verified customers
Site team scopes who can see the site. Leave it empty and the workspace default applies, so everyone with the right role sees the site. Assign at least one agent and only those agents see the site's visitors, conversations, and tickets. Only the primary owner can change the assignment; click agents to toggle them and Save team.
Verify your customers stops visitors from impersonating one another. Click Generate secret, then use Email setup to a developer to send your developer the shared secret and a code snippet in the language you pick (Node, PHP, Python, Ruby, Java, Go, or C#). Once your site signs a token for each logged-in visitor, the inbox shows verified names and emails instead of whatever the visitor typed. The panel badge moves from Off to Waiting to Active as real verified visitors arrive. There are also optional browser SDK helpers documented on the same card: identify() to tag a visitor who signed up, open/close/toggle to drive the widget from your own buttons, and track() to record outcomes like signups and purchases.
Related: set up your account in Getting started, manage who can edit sites in Team, and adjust workspace-wide options in Settings.